We value precision in maintenance, yet a simple oil change can reveal hidden issues. As we guide you through proper lube, filtration, and fuel compatibility, we stay safety-conscious and methodical. We’ll outline steps, checks, and disposal without shortcuts. If we miss a detail, a minor oversight can cascade into risk or downtime. Let’s tackle the fundamentals together and uncover the next actionable steps that keep your generator reliable under load.
Key Takeaways
- Confirm fuel compatibility and correct oil grade before starting; use the right viscosity and multi-viscosity expectations for climate and load.
- Drain, replace oil and filter, lubricate gaskets, and torque drain plug and filter to OEM specs; inspect bypass valves.
- Perform post-change checks: verify oil level, leaks, noises, and proper operation of exhaust, intake, and cooling components.
- Log oil type, quantity, disposal date, and post-start oil level; ensure waste and filters are disposed per regulations.
- Schedule changes based on duty cycle, environment, and equipment criticality; never mix used oil with additives unless prescribed.
What Is the Purpose of an Oil Change for Generators
The purpose of an oil change for generators is to guarantee the engine runs smoothly, stays lubricated, and avoids wear from contaminated or degraded oil. We approach this task with a safety‑first mindset, confirming fuel compatibility and correct oil grade before any work. Proper generator lubrication reduces friction, prevents hot spots, and extends component life, especially at startup and under load. We verify the oil level, viscosity, and cleanliness, noting any metal particles or emulsions that signal contamination. We follow a clean draining procedure, install fresh oil, and run the engine briefly to distribute lubrication and observe for leaks. We document the maintenance, schedule the next change, and never mix oils or fuels. This disciplined approach minimizes failure risk and supports reliable performance in critical scenarios.
How Often to Change Generator Oil by Type and Duty

Oil-change frequency depends on the generator’s type and how it’s used. We tailor schedules by load, duty cycle, and environment, so you get reliable protection without waste.
- Home standby with frequent starts
- Portable unit for long outdoor jobs
- Continuous-duty industrial model
- Infrequent seasonal use
- High-temperature or dusty locations
We set intervals that prioritize generator safety and minimize engine wear. For harsh duty or frequent mission-critical runs, drain and replace oil more often, and inspect filters for contamination. Always log the change and verify oil level after startup. Remember fuel storage practices, since degraded fuel accelerates oil toxicity and corrosion risk. Keep containers sealed, off the floor, and away from heat sources. Use clean tools and avoid spills. Adhere to manufacturer guidelines, and don’t overlook ventilation and fire-safety measures during service.
Choosing the Right Oil for Generators
We’ll start by matching oil viscosity to your generator’s load and temperature, so we know the correct SAE grade and whether to use multi-viscosity options. We’ll compare synthetic and conventional oils, weighing cost, performance, and maintenance intervals against your duty cycle. We’ll also check OEM recommendations and guarantee compatibility with gaskets, seals, and any fuel considerations for safe, reliable operation.
Oil Viscosity Basics
What viscosity you choose matters for performance and protection, so let’s pin it down: selecting the right oil viscosity for your generator means matching it to the engine’s operating temperature range and specification, ensuring reliable starts and steady lubrication under load.
- Understand viscosity classes (SAE ratings) and how they relate to climate
- Check manufacturer guidelines for minimum and maximum viscosities
- Compare cold-start behavior versus hot-running protection
- Note viscosity enzymes and how they influence film strength under stress
- Plan for seasonal changes and potential altitude variations
We approach this with safety in mind, avoiding overloading plugs and ensuring proper drainage. By keeping precise viscosity decisions, we safeguard lubrication, reduce wear, and maintain dependable performance across operating conditions.
Synthetic vs Conventional
Synthetic oil offers quicker flow at cold starts and better resistance to thermal breakdown under heavy load, but conventional oil can be perfectly adequate for many generators at standard temperatures and lower maintenance costs. We recognize the choice hinges on operating conditions, expected load, and interval discipline. Our approach emphasizes real-world practicality: assess ambient temps, startup frequency, and the generator’s tolerances. We prioritize clean oil paths, correct filter fit, and strict adherence to capacity guidelines. While synthetic delivers margin under demanding cycles, conventional brands meet routine needs with proper maintenance and timely changes. We guide readers to match viscosity and grade to range-tested performance. If you encounter an irrelevant topic or off topic discussion, redirect to core engine protection practices and documented manufacturer specs for reliability.
OEM Oil Recommendations
Oil recommendations from the OEM matter because using the right oil protects tolerances and extends service life. We follow manufacturer specs to ensure lubrication film strength, correct viscosity, and additive balance, especially under load and temperature swings. Always verify the oil label for grade, API/ACEA certifications, and any engine-seal cautions. We assess viscosity bands for seasonal starts, warranty constraints, and compatibility with auxiliary systems. Using non-specified oil can void warranty and increase wear, while the right oil supports cooldown cycles and fuel-efficiency. We test compatibility with filters and gaskets, document changes, and respect oil-change intervals.
- Check API/ACEA ratings on the label
- Confirm viscosity aligns with ambient temps
- Review warranty impact before use
- Inspect seals for compatibility
- Record batch and service date
How to Prep Your Generator Before an Oil Change
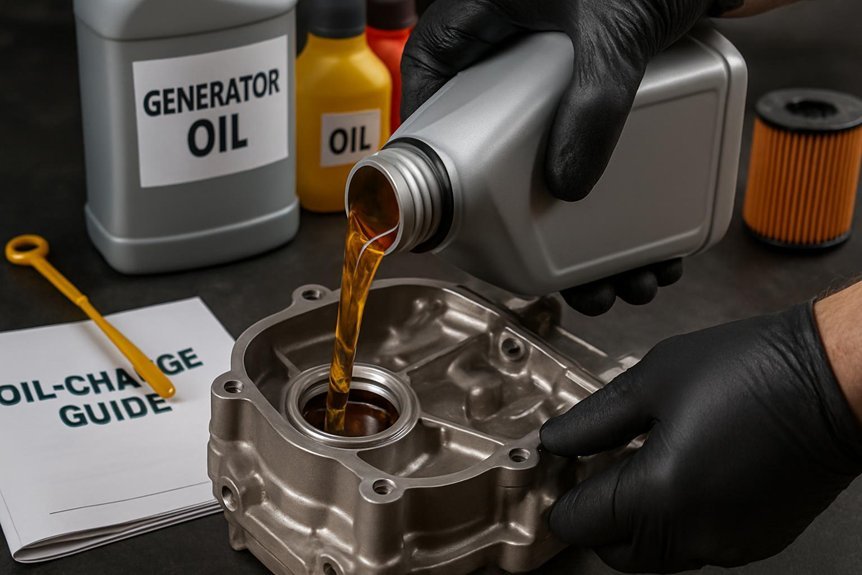
Ready to prep? We approach prep as a precision task, not a guesswork ritual. We begin with our generator powered down, cooled, and disconnected from any load. We verify oil capacity and the oil type specified by maintenance schedules, confirming compatibility with the model. We inspect the drain plug and gasket for wear, replacing as needed to prevent leaks. We remove the old filter if applicable, noting its orientation for correct reuse or disposal. We drain residual oil into a labeled container, then wipe seals and surfaces clean to avoid contamination. We check fuel stability: stabilize fuel if storage extends beyond a few weeks, and label the date. We gather tools, PPE, and a clean workspace to ensure safety and accuracy.
Step-by-Step: Changing the Oil Safely and Correctly
How do we begin changing the oil safely and correctly? We approach with a clear checklist, proper PPE, and precise steps. We drain old oil, inspect drainage paths, and replace with the correct grade. Maintain fire-safety margins and avoid spills by positioning absorbent mats. Record hours and quantity for disaster preparedness records, then dispose of waste promptly at an approved facility. Use fresh oil and torque specs, and verify the unit sits on a level surface during measurement.
- Prepare PPE and spill containment
- Verify oil type, quantity, and filter compatibility
- Position generator for clean drainage and ventilation
- Monitor temperatures and avoid splashes
- Store used oil away from fuel storage and ignition sources
Replacing the Oil Filter and Checking Other Filters
We’ll replace the oil filter with a clean, compatible unit and inspect its seal for damage before installation. We’ll also check other filters—air, fuel, and breather—looking for debris, proper seating, and signs of wear. If anything looks compromised, we’ll replace it or service it per the manufacturer’s specs and tighten connections to the correct torque.
Replacing Oil Filter
Replacing the oil filter is a critical step in an oil change, and doing it correctly prevents leaks and protects engine life. We approach this with precision, using proper tools and clean technique to ensure a tight seal and no cross-contamination.
- Prepare workspace and collect required oil filter materials
- Loosen filter counterclockwise with filter wrench, drain gasket residue
- Lubricate new filter gasket and install by hand to snug plus a final gentle turn
- Refill system and check for leaks after initial run
- Dispose of old filter properly as part of filter disposal
Safety first: wear gloves, keep drains secure, and dispose of fluids per regulations. We’ll verify no residual drips and confirm normal pressure rises after starting briefly.
Checking Other Filters
Should we extend the oil change check to verify other filters while we’re at it? Yes. We’ll inspect and replace the oil filter if needed, and then assess air, fuel, and other inline filters for cleanliness and proper seating. We stay safety-conscious, powered down, and drained, using gloves and eye protection. Check filter compatibility with the model and confirm gasket integrity before installation. A bypass valve should function freely to prevent pressure buildup. If present, test for leaks after starting the engine and observing oil pressure. Below is a quick checklist table to guide you through the steps and ensure no filter is overlooked.
| Step | Action | Result |
|---|---|---|
| 1 | Inspect compatibility | Confirm fit |
| 2 | Replace if needed | New seal seated |
| 3 | Inspect bypass valve | Smooth operation |
| 4 | Test start | No leaks |
Post-Change Checks and Oil Disposal Tips
After the oil change, we’ll verify critical system readiness and properly handle waste to prevent leaks, contamination, or safety hazards. We outline precise post-change checks and oil disposal tips to keep the generator reliable and compliant.
- Confirm oil level within range on the dipstick and correct any variance immediately
- Inspect drain plug, gasket, and catch basin for seepage or damage
- Check exhaust, air intake, and cooling shrouds for obstructions or loose fasteners
- Replace or secure the oil filler cap and vent system to prevent spills
- Dispose of used oil and filters per local regulations, labeling waste containers clearly
Oil disposal steps: use approved containers, avoid mixing fluids, and document disposal dates. Post change checks ensure safe operation and compliance.
Troubleshooting Common Oil-Change Mistakes
Have you checked for common oil-change mistakes before they become problems, so you can stay on schedule and prevent damage? We approach this with precise steps, isolating variables to avoid cross-contamination. First, confirm the drain and fill procedures match the manufacturer’s specifications; a mismatch invites pressure and seal issues. Next, inspect the new oil’s grade, quantity, and compatibility with generator fuel and operating temperature. Don’t mix used oil with additives unless prescribed; contamination risks clogging filters and reducing lubrication efficiency. Verify the filter seats cleanly and torque to spec to prevent leaks. Finally, test run after completion, observing for leaks and abnormal noises. Maintain proper battery storage during service to prevent accidental shorts, and document the exact oil type and quantities for future reference.
How to Establish an Ongoing Maintenance Schedule
Establishing an ongoing maintenance schedule starts with documenting a clear, repeatable cadence tied to the generator’s manufacturer guidelines and operating conditions. We’ll define tasks, intervals, and ownership, then monitor performance to keep uptime optimization at the forefront. Our approach blends practicality with safety, ensuring checks are performed consistently and recorded for traceability. By aligning maintenance schedules with real-world usage, we minimize surprises and extend component life while protecting personnel. This disciplined framework supports proactive repairs, reduces downtime, and improves reliability during critical operations. We’ll implement standard operating procedures, train operators, and verify results with simple audits.
- Record-keeping cadence and responsible parties
- Visual inspections and fluid level checks
- Filter, coolant, and battery health assessments
- Start-up, run, and post-run verification
- Documentation, review, and continuous improvement
Frequently Asked Questions
How to Know When Oil Has Degraded Due to Contaminants?
We can tell oil has degraded from contaminants by bypass oil oxidation signs and detect fuel dilution through dipstick notes, color shifts, and engine noises; we monitor viscosity, perform tests, and follow safety procedures to prevent damage.
Can Generator Oil Change Be DIY Without Draining Old Oil?
We can’t safely do a generator oil change without draining old oil; 1 in 4 DIY attempts skip proper draining, risking contamination. We’ll guide you through generator oil change steps, highlight diy considerations, with precise, safety-conscious, hands-on methods.
What Signs Indicate Oil Leaks After a Change?
We see oil leak symptoms if drips appear under the sump or on hoses after a post change inspection; monitor oil level, tighten fittings, and recheck seals promptly, staying safety-conscious and precise during pressure and leak tests.
Is There a Preferred Oil Grade for Extreme Temperatures?
Yes—we prefer a high-temp, low-temp range with oil viscosity suited to ambient temperature. We select: 5W-30 or 10W-30 for most ambient temps, and 0W-40 for extreme cold or heat, ensuring safe, precise operation.
How Do You Recycle Used Generator Oil Responsibly?
We recycle used oil responsibly by choosing certified recycling options and avoiding improper disposal; we never pour it down drains. We’ll seal and transport it safely, then follow local regulations for proper disposal and hazardous-waste handling.
Conclusion
We’ve shown you the steps to change generator oil safely, accurately, and on schedule, from selecting the right oil to disposing of used fluid properly. One striking stat: proper oil changes can extend generator life by up to 40% by reducing wear and overheating. Stay precise with oil grade, check seals, torque fasteners, and log all details to build a dependable maintenance history. Together, we’ll keep your generator ready, reliable, and compliant.

