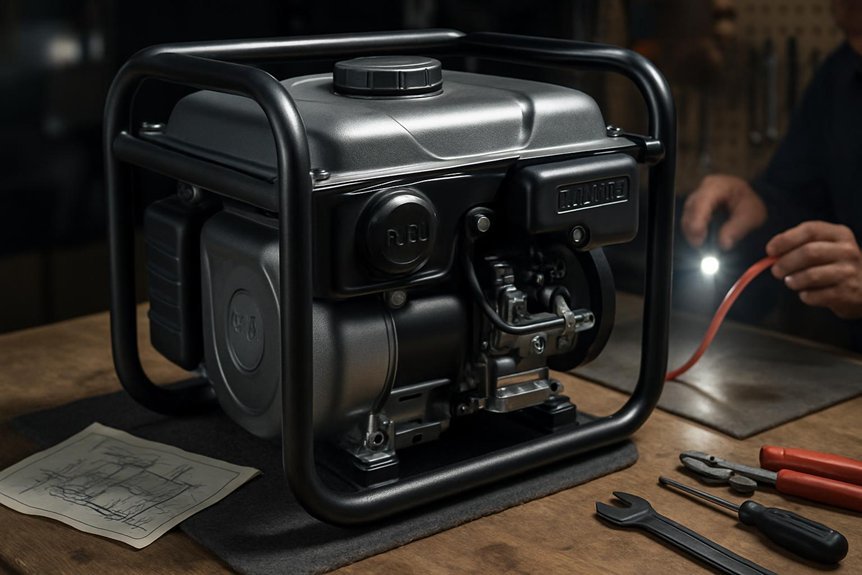
We picture a quiet garage illuminated by a pale glow as we approach the generator with steady hands. We’ll start with safe, methodical checks—disconnect the battery, unplug loads, and verify fuel quality and any leaks—before moving on to air, exhaust, and carburetor upkeep. If the engine sputters under load, we’ll document the symptoms and use calibrated meters to guide our steps, keeping a professional mindset and waiting to escalate when the signs call for it.
Key Takeaways
- Check fuel quality and lines first; stale fuel or leaks commonly cause generator startup and idle issues.
- Inspect spark plug, ignition wiring, and battery/charging system for proper timing and reliability.
- Clean or replace air filters and inspect intake/exhaust routes to prevent obstructions and overheating.
- Use manufacturer torque specs, perform safety steps, and isolate subsystems before deeper diagnostics.
- Document findings, test under load with calibrated meters, and know when to seek professional service.
Quick Start Checks to Diagnose a Sputtering Generator
If your generator is sputtering, the quickest place to start is a structured, repeatable check of the basics. We’ll guide you through quick checks that isolate common causes without guesswork. Begin with fuel quality, checking for stale fuel, contaminants, and correct ethanol content. Confirm the choke position and ensure the carburetor is not flooded. Inspect air intake for obstructions and verify the spark plug condition, gap, and wiring; replace worn components as needed. Listen for irregular ignition and verify the grounding connection. Verify the recoil or electric start operates cleanly, noting any inconsistent cranking. Monitor engine RPM with a tachometer if available, watching for irregular or low values that produce sputter clues. Document findings, reset components, and retest to confirm stable operation.
Identify Fuel Issues and Remedy Simple Fixes
We’ll start with a focused fuel system check to identify common issues and confirm proper flow. If fuel is stale, we’ll explain how to safely replace it, and if lines or filters are clogged, we’ll outline a step-by-step cleaning or replacement procedure. By addressing these fuel issues directly, we set a precise foundation for reliable operation and quick remedies.
Fuel System Check
Fuel system issues are a common limiter to portable generator performance, so we start with a focused check of the fuel line, carburetor, and fuel filter. We inspect for cracks, kinks, and leaks, ensuring secure fittings and proper routing. We drain the tank and lines to observe flow consistency, then monitor fuel for varnish or water contamination. We remove and clean the carburetor jets, float, and needle seat, testing for sticking components or improper float height. We replace a clogged filter and verify fuel pressure within specification. We confirm that the fuel system delivers steady, clean flow to the carburetor while ignition timing remains correctly synchronized with the engine cycle. If issues persist, we document findings and plan a targeted diagnostic step.
Fix Fuel Issues
Regularly, we start by pinpointing common fuel issues that limit performance and apply straightforward remedies. We assess fuel quality first: old, ethanol-blended, or contaminated fuel can cause hard starts and rough running. If fuel is stale or dirty, drain the tank, clean the carburetor jets, and replace the inline filter. Use fresh, ethanol-blend-compatible fuel and stabilize it for storage. Check for air leaks in lines that can worsen fuel delivery and install new gaskets if needed. For emission control, ensure the system isn’t obstructed by carbon buildup; clean the throttle body and gas pathways with appropriate solvents. Run the generator under load to verify steady RPM and smooth power, then retest fuel pressure to confirm consistency.
Spark Plug and Ignition Basics: Test and Replace Safely
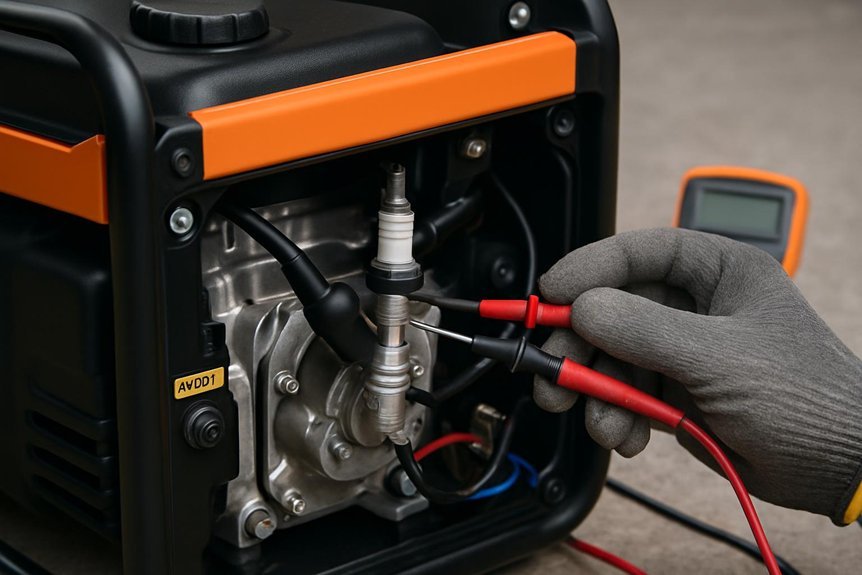
We’ll start by inspecting the spark plug for wear, gaps, and fouling, documenting findings with a precise checklist. Next, we’ll verify the ignition system safety, disconnecting power and testing ignition components methodically before any replacement. Finally, we’ll test and replace as needed, using proper torque specs and verifiable baseline readings to guarantee reliable starts.
Spark Plug Inspection
To inspect a spark plug safely and reliably, start by removing the plug boot and isolating the ignition system to prevent accidental shock. We then inspect the spark plug for electrode wear, carbon fouling, and oil deposits, noting the gap and overall condition. Use a feeler gauge to verify the electrode gap matches the manufacturer’s specification, and record any deviation for replacement. If signs of fouling or damage appear, replace the plug with the correct type and heat range, ensuring a proper seating torque. While testing, confirm that the ignition timing is consistent with the unit’s specification, as advanced or retarded timing can indicate related issues. Document findings and schedule maintenance if discrepancies persist, avoiding unnecessary adjustments without full diagnostic confirmation.
Ignition System Safety
How can we safely manage ignition system work on portable generators? We, as technicians, approach ignition safety with a systematic checklist. Begin by disconnecting power sources and removing the battery, if present, to prevent accidental starts—this is battery handling done correctly. Next, inspect spark plugs for wear, correct gap, and clean electrodes; replace if fouled or damaged. With the spark system exposed, verify ignition coil connections are secure and free of corrosion. Use insulated tools and keep wires away from hot surfaces. When testing, ground the engine properly and test spark at the plug during cranking, stopping immediately if no spark or inconsistent flashes occur. Reassemble only after confirming a crisp, consistent ignition signal and recheck torque on all fasteners. Maintain ignition safety records for future service.
Carburetor Troubleshooting for Stalling Engines
What causes a portable generator to stall at idle or under load, and how can we systematically diagnose the carburetor to restore steady operation? We approach this with controlled steps. First, verify fuel quality, air intake, and spark timing to rule out external causes. Next, remove the carburetor and inspect the float, needle, and jets for residue or misalignment. Clean passages with appropriate carburetor solvents only after a visual inspection confirms restrictions. Perform a careful carburetor cleaning to remove varnish and debris, then reinstall with proper gaskets and seals. Set idle adjustment to the manufacturer’s spec, confirming smooth idle without hunting. Reassemble, test under light and loaded loads, and monitor for consistent RPM. If stalling persists, repeat cleaning and verify fuel metering within tolerance.
Battery, Wiring, and Electrical Checks for Consistent Startup
We’ll start by confirming the electrical system in support of reliable starts, following the carburetor work with a systematic check of battery, wiring, and electronics. We inspect the battery’s charge state with a load test, verify terminals for corrosion, and verify secure connections. Next, we follow wiring diagrams to trace circuit continuity, inspecting harnesses for wear, frayed insulation, and loose splices. We validate the alternator or charging coil output matches spec and verify ground continuity from chassis to battery negative. We perform voltage drop tests on critical paths to pinpoint resistance hotspots. If faults arise, we document findings with precise measurements before reassembly. This disciplined approach prevents intermittent starts and post-start electrical faults, reinforcing reliability through disciplined maintenance of battery testing and proper interpretation of wiring diagrams.
Air and Exhaust: Breathing Room and Cleaning Tips
Air and exhaust systems require clear space and clean passages to perform reliably. We inspect intake and outlet routes for obstruction, removing debris that can restrict airflow. Our approach emphasizes deliberate cleaning: wipe surfaces, vacuum dust from louvers, and loosen any surface grime without forcing components. Maintain unobstructed air supply by keeping surrounding area free of stored materials and vegetation. Inspect exhaust piping for cracks, loose clamps, or corrosion, and replace damaged sections to preserve exhaust safety. We verify that heat sinks remain free of lint and that cooling fins are accessible to air flow. When testing, monitor for unusual exhaust odors or fading engine response. Prioritize air quality by ensuring fresh intake is uncontaminated, and document findings to guide ongoing maintenance.
Maintenance Habits to Prevent Future Stalls and Sputtering
Do stalls and sputtering point to fuel, ignition, or air-delivery gaps that we can address with disciplined maintenance. We maintain a balanced workload by matching load to capacity, avoiding overloads that trigger stress and stumbles. Regular checks keep ignition timing and spark quality in spec, while air-delivery paths stay clear of obstructions. We schedule routine fuel system care, including stabilizer use and filter inspections, and we verify tuel lines for leaks or degraded seals. Noise control is part of precision operation, so we tighten exhaust fittings and insulate where practical. Table highlights below guide our routine:
| Area | Action | Frequency |
|---|---|---|
| Fuel system | Stabilizer, filter, lines | Quarterly |
| Air intake | Clean, replace pre-filter | Monthly |
| Ignition | Spark plugs, coil | Every 6 months |
When to Perform Advanced Diagnostics at Home
Advanced diagnostics at home should be pursued when symptoms persist beyond routine maintenance but before a complete failure occurs. We outline a disciplined workflow to avoid misdiagnosis and wasted effort. First, confirm symptom consistency by reproducing it under load with a calibrated meter, noting voltage, frequency, and current draw. Next, isolate subsystems: fuel, ignition, charging, and electrical load. Use manufacturer-recommended torque specs and safety checks, recording readings at each stage. If spark quality or compression appears marginal, perform targeted tests such as compression comparison or spark-injector inspection with proper PPE. Log environmental factors, recent maintenance, and fuel stability, then compare against service bulletins. Only proceed to deeper diagnostics when variations exceed baseline tolerances. Two word idea, two word idea.
When to Call a Pro: Signs You Need Professional Service
When should you call a pro? We’ve built a clear rubric for when professional service is warranted to minimize downtime and safety risks. If your generator exhibits persistent startup failures, erratic voltage output, or unusual odors, stop and escalate to a pro for immediate inspection. Recurrent fuse blows, overheating, or audible knocking indicate internal faults beyond DIY remedies. Structural damage, fuel-system leaks, or lingering after- effects from improper storage require expert assessment. We’ll rely on a defined inspection schedule, documenting symptoms, maintenance gaps, and corrective actions to guide calibrated decisions. For complex issues, we’ll prioritize tool selection that matches the diagnosis, avoiding improvised fixes. Trust a professional when results are uncertain, components obstruct routine checks, or warranty terms require certified intervention.
Frequently Asked Questions
How Often Should I Change the Oil in a Portable Generator?
We change the oil every 50 hours of operation or annually, whichever comes first, to maintain oil maintenance standards and engine longevity, and we review fuel considerations during each interval to ensure optimal performance.
Can Fuel Stabilizer Prevent Ethanol Damage in Generators?
“Better safe than sorry.” We can say yes: fuel stabilizer helps ethanol compatibility by reducing water and phase separation, and improves storage; we use ethanol-compatible formulations for fuel stabilization to protect generators’ carburetion and fuel systems.
Does Cold Weather Affect Generator Fuel and Starting Reliability?
Cold weather can reduce starting reliability and slow fuel vaporization, affecting ignition. We systematically check battery health, choke operation, and fuel stability, then perform a cold-start procedure; if needed, apply stabilizers and proper viscosity oil for reliability.
What Safety Gear Is Essential When Troubleshooting at Home?
We always wear safety eyewear, hearing protection, and proper fuel handling gear because improper practices cause 30% of home generator incidents. We guide you through procedures, checking PPE, securing fuel, isolating ignition sources, and documenting each step.
How Do I Choose the Right Replacement Spark Plug Gap?
We determine the spark plug gap by consulting the engine’s spec sheet, then measure precisely and adjust with a gap tool; for Replacement options, choose OEM or high-quality aftermarket plugs matching the spec. We document results.
Conclusion
We’ve walked through quick checks, fuel fixes, spark reliability, carburetor concerns, and electrical integrity, so you can methodically diagnose and stabilize a sputtering generator. If symptoms persist under load, document readings and consult service bulletins before deeper diagnostics. Remember: safety first, disconnect battery and loads, and use proper PPE. When in doubt, or if warranty terms apply, don’t hesitate to call a pro. Sometimes, patience is the most precise diagnostic tool we have.

