We want to fix a generator that won’t start, yet we can’t rush to conclusions. We’ll start with the basics—fuel, battery, and spark—then verify safety interlocks and clean connections before moving to starting methods and choke/primer checks. If symptoms persist, we’ll rule out mechanical wear and maintenance gaps, reseat harnesses, and recheck grounds after each step. Stay steady as we walk through a controlled cold-start sequence and decide our next targeted test.
Key Takeaways
- Verify fundamentals: fuel in tank and correct line routing, clean filters, and no fuel obstructions to ensure engine is actually getting fuel.
- Check battery and grounding: ensure voltage, clean tight terminals, solid ground, and secure main power cables for reliable starting.
- Inspect spark and ignition: test spark plug condition and gaps, inspect wiring, and replace worn plugs as needed.
- Test start switch and relays: perform resistance and continuity checks, ensure proper ON/START/OFF behavior, and reseat faulty connectors.
- Review safety interlocks and electrical paths: confirm interlocks engaged, no bypassed switches, fuses intact, and clean/secure connectors.
Identify the Symptoms the Generator Is Showing
To identify the symptoms the generator is showing, start by noting all observable indicators: starting trouble, unusual noises, vibratiion, loss of power, stale fuel smells, or warning lights on the control panel. We approach this systematically: collect symptoms as they appear, verify consistency, and separate intermittent issues from constant ones. Document when each symptom occurs, under what load, and under what temperature or moisture conditions. Compare against our generator basics reference to distinguish normal fluctuations from anomalies. Discard vague impressions; rely on concrete signals such as voltage dips, RPM irregularities, or failure to engage. Identify patterns, not isolated quirks. Be wary of maintenance myths that mislead diagnosis; focus on verifiable data and repeatable observations. This clarifies root causes before deeper checks.
Check the Essentials: Fuel, Battery, and Spark
Have you ruled out the basics yet? We start with the essentials: fuel, battery, and spark. First, inspect the fuel system. Confirm there’s fuel in the tank, verify the correct line orientation, and check for clogged filters or obstructions in the carburetor or fuel pump. If fuel isn’t reaching the engine, resolve that before proceeding. Next, test the battery: voltage should meet the manufacturer’s spec, and connections must be clean, tight, and free of corrosion. Then assess spark ignition readiness by inspecting spark plug condition, gaps, and wiring continuity. Replace worn plugs and repair damaged leads as needed. If all three basics test normal, advance to further diagnostic steps; otherwise, address faults directly to prevent unnecessary teardown.
Inspect Safety Interlocks and Electrical Connections

We’ll start by checking safety interlocks and electrical connections to rule out simple, preventable failures. We verify that all interlocks are engaged and that safety switches aren’t bypassed. We inspect control panels for damaged wiring, loose terminals, and missing or corroded connectors. We test that starter and run relays seat fully and click when activated. We trace power paths from the battery to the ignition circuit, confirming fuses and breakers are intact and no insulation is compromised. We reseat or replace any faulty connectors, clean corrosion, and ensure grounding is solid. We record findings and recheck after adjustments. This focused inspection safety routine prevents misdiagnosis and isolates intermittent faults related to electrical connections.
Diagnose Starting Methods and Choke/Primer Use
We’ll start by reviewing the available starting methods and confirming they’re appropriate for this generator model. Next, we’ll test choke and primer usage, noting whether the choke is engaged correctly and if the primer delivers a firm, consistent pulse. If the engine still won’t start, we’ll follow the diagnostic steps to isolate fuel delivery, air intake, and ignition issues.
Starting Methods Review
Diagnosing starting method issues hinges on how the choke and primer are used, and we’ll walk through each method step by step to identify where misapplication or timing gaps occur. We begin with manual choke, then switch to automatic systems, noting when enrichment or declutching delays cause failure to fire. For primer-based starts, we verify priming cadence, gas freshness, and cylinder wetting before attempts. In each case, we assess sequence correctness, ignition timing, and compression awareness, documenting deviations. We consider start up alternatives when standard methods fail, such as staged cranking or intermittent choking, and we compare results against expected indicators. Fuel system considerations guide decisions, ensuring supply, cleanliness, and proper venting are intact for reliable hot and cold starts. We conclude with actionable checklists for rapid diagnostics.
Choke/Primer Techniques
Starting with the choke and primer, we inspect their use with the same methodical eye we apply to other starting techniques. We assess whether the choke is set correctly for cold starts, then confirm it’s opened gradually as the engine fires. We verify primer operation by observing injection, pressure feel, and smooth pumping without leaks. If the primer is weak, we test for fuel flow, valve seating, and line integrity, noting any air intrusion. We document the exact positions and timing used during attempts, eliminating guesswork. We maintain a controlled sequence: cold start, partial choke, prime, crank, and observe the response. If starting remains sluggish, we isolate fuel delivery issues and recheck seals. This approach supports precise, repeatable primer troubleshooting and reliable choke techniques.
Diagnostic Troubleshooting Steps
We begin with a structured diagnostic plan to diagnose starting methods and choke/primer use. We outline steps, verify fuel supply, and assess ignition timing before touching carbs. First, confirm the choke/primer position and state of the fuel valve. Next, check spark at the plug—gap, wetness, and coil resistance. If spark is weak, inspect kill switch, wiring, and ground continuity. Then evaluate starting methods: manual pull, key, or electric start, noting any resistance or inconsistent engagement. Inspect air filter and intake for obstruction. Purge the carburetor briefly, then restore normal operation. Record observations with concise notes; include start up anecdotes for troubleshooting context and maintenance humor to ease tension. Finally, repeat tests after each adjustment to confirm a successful restart.
Rule Out Common Mechanical and Maintenance Issues
To rule out common mechanical and maintenance issues, we start with a quick, methodical check of the generator’s basic physical state and service history. We inspect mounting, fasteners, and belts for looseness or wear, then verify oil level, coolant, and fuel integrity. We review service logs for recent maintenance, filter changes, and fluid replacements. Next, we assess the air intake for obstructions, and confirm exhaust paths are clear. We test the idle maintenance routine, ensuring the air and fuel circuits aren’t gummed or blocked. We examine the windage control for proper operation and any binding within the rotor assembly. Finally, we confirm battery connections, starter integrity, and fuse continuity. If all checks pass, we proceed with targeted diagnostics rather than component swapping.
Step-by-Step Fixes You Can Try Before Calling a Pro
We’ll start with a quick check of fuel quality, ensuring it’s clean, fresh, and free of water or contaminants. Next, we’ll inspect all electrical connections for corrosion, tightness, and proper seating, then verify the start switch is functioning as intended. If any issue is found here, we’ll address it before calling a pro.
Check Fuel Quality
If you’re wondering why your generator won’t start, poorly fueled components are a common culprit. We’ll assess fuel quality first, then act. Start by inspecting the visible fuel in the tank for clarity and color; look for cloudy liquid or sediment that indicates contamination. If fuel smells sour or varnishy, assume degraded gasoline and replace it. Drain the tank and lines as needed, disposing of the old fuel according to local regulations. Refill with fresh, clean gasoline meeting the engine’s octane spec, and add a suitable stabilizer if storage is extended. If you notice repeated issues, consider that rejected fuel or contaminated gasoline may be the root cause and not the ignition system. Re-test starting and observe for smooth operation.
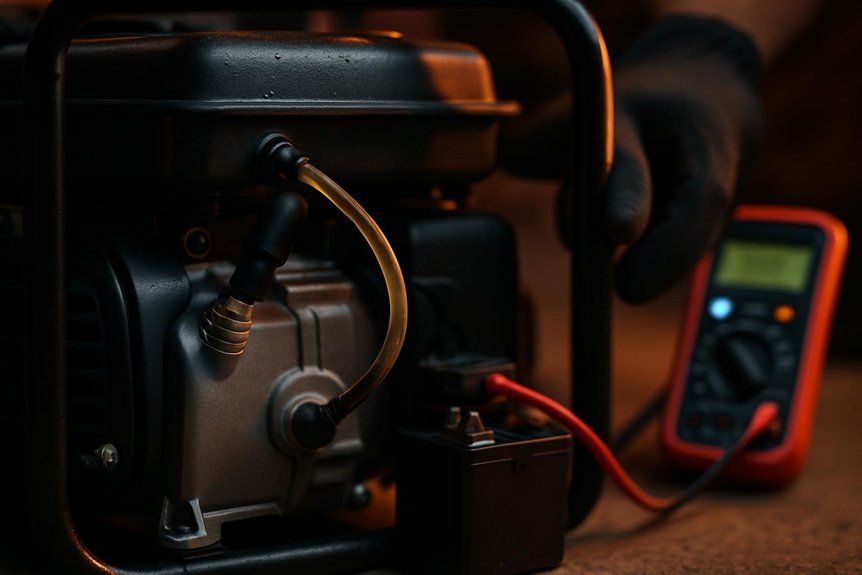
Inspect Electrical Connections
Could loose or corroded electrical connections be keeping your generator from starting? We approach this step with calm, methodical checks, documenting findings as we go. We focus on safe evaluation first, then corrective actions, avoiding unrelated topic tangents or irrelevant issue distractions.
- Inspect battery terminals and main power cables for looseness or corrosion, cleaning with a wire brush as needed.
- Check ground connections and terminal bolts, tightening to manufacturer spec and ensuring a solid metal-to-metal bond.
- Trace wiring harnesses for damaged insulation or pinched conductors, replacing segments and resecuring harness clamps.
If any connection shows wear or inconsistency, address it before proceeding. This keeps the system from chasing an unrelated topic or irrelevant issue and supports reliable starting.
Verify Start Switches
Have you ruled out the start switch as the culprit? We’ll verify start switches by testing each control position and noting results. If the switch feels loose or sticky, or the lever doesn’t return, the problem likely lies here. We identify symptoms like intermittent cranks, no engagement, or faint clicks, then rule out the switch with a direct resistance check and continuity test. When possible, measure voltage at the switch terminals in the ON position and confirm proper grounding. Record findings clearly, then proceed to replace or reseat the switch if needed.
| Position | Expected Result | Observed Result |
|---|---|---|
| ON | Continuity between input and output | |
| START | Momentary continuity | |
| OFF | Break in circuit |
Frequently Asked Questions
Can a Bad Carburetor Cause a No-Start Condition?
Yes, a bad carburetor can cause a no-start condition. We’ll check for fuel contamination, inspect jets and float, clean or replace components, and confirm proper fuel delivery before retesting the engine’s starting sequence.
Should I Check Oil Level When Troubleshooting Starting Issues?
Yes, we check the oil level and oil pressure first, then inspect spark plugs and ignition timing. If oil is low or pressure abnormal, address before continuing—this prevents misfires and improves starting reliability in our troubleshooting process.
Can Overload or Recent Fuel Contamination Prevent Starting?
Yes, overload or recent fuel contamination can prevent starting. We’ll inspect overheating ignition, verify oil pressure sensors, drain contaminated fuel, test spark, and reset protection, then retest starting with proper fuel and clean filters.
How Do I Reset a Tripped Circuit or Safety Switch?
“Take the plunge”—we’ll reset the circuit. To reset: locate the safety shutoff, switch off, wait 10 seconds, flip to reset. Then check fuel system, ensure no leaks, and press the circuit reset; verify power return.
Is There a Safe Order to Drain and Replace Fuel?
Yes, we follow a safe order: drain fuel first, then replace with fresh fuel. We disconnect spark and battery, ventilate area, drain slowly, seal contaminated containers, and refill with clean fuel, checking for leaks and proper fuel quality.
Conclusion
We’ve walked the basics and delved into the details, and what’s essential is this: fuel and spark are twins; without one, the other’s useless. When the lights won’t come on, we test fuses and feeds, then chase sparks where they should fly. It’s the calm contrast of certainty and doubt—the clean, measured steps against stubborn enigma. We fix what we can, then recheck, reboot, and restart, knowing progress hides in every controlled, deliberate retry.

