We start with a quick safety check before servicing a portable generator, then move through the air filter, oil level, fuel lines, and spark plug, keeping the work precise and organized. We’ll verify the battery, safety switches, and interlocks, test for proper startup and load behavior, and note any leaks or abnormal sounds. We’ll tighten, replace, or adjust as needed, document outcomes, and prepare for storage. If we stay disciplined, we’ll uncover what’s most important for reliable power—and the next step awaits.
Key Takeaways
- Perform safety checks, disconnect power, wear PPE, and ensure a stable, ventilated area before any service.
- Inspect and replace/clean air filter, check oil level, and ensure no obstructions in the intake and filtration path.
- Inspect spark plug and fuel system; check lines, carburetor basics, and ensure proper ignition timing and fuel delivery.
- Test electrical components, batteries, interlocks, and wiring; verify voltages, regulator function, and correct load during tests.
- Document findings, re-test under load, and store properly with cooled engine, stabilized fuel, and fresh oil after service.
Start With a Quick Safety Check Before Servicing
Before we touch the generator, we perform a quick safety check to prevent hazards. We verify the unit is on a stable, level surface, away from fuel, heat, and ignition sources. We disconnect the power supply and remove the key or battery disconnect to prevent accidental startup. We wear eye protection and gloves, inspect cables for wear, and confirm the fuel valve is off before opening. We check the ambient area for obstructions and ensure ventilated airflow. We review start up cautions and confirm the area is clear of people and pets. We reference maintenance scheduling, noting due dates for filters, fluids, and lubrication. We document findings and set reminders for the next service interval. If anything seems abnormal, we halt and reassess before proceeding.
Inspect the Air Filter and Oil Level
We’ll start by checking the air filter and the oil level to ensure the engine breathes freely and stays lubricated. If the filter is dirty, we’ll replace or clean it per the manufacturer’s directions, then verify the oil level is within the recommended range. We’ll perform these checks before any load, and address any issues promptly to prevent damage and unsafe operation.
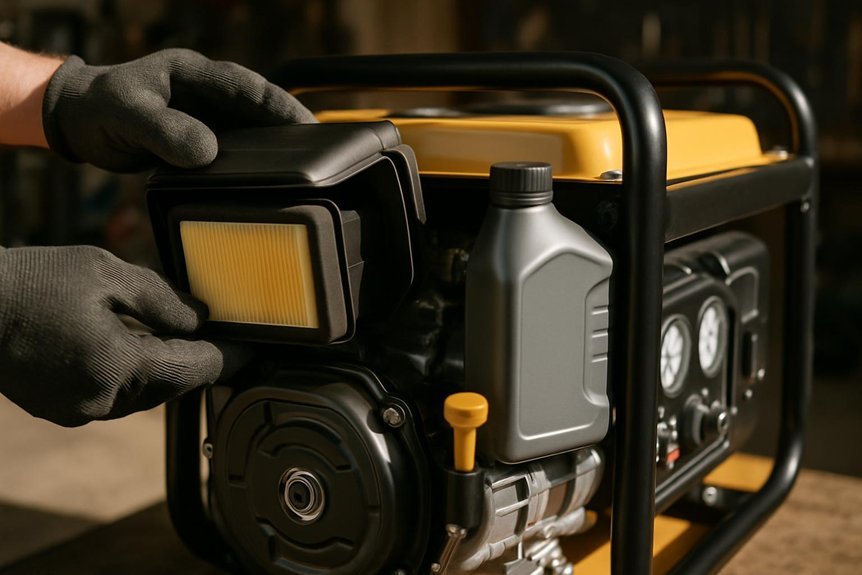
Check Air Filter
Do you know when your generator breathes easier? We start with the air filter. Check for visible damage: cracks, tears, and excessive dirt. If it’s dirty, remove it carefully, noting how it fits. Inspect the air intake for blockages and clean or replace the filter according to the manufacturer’s guidelines. When reinstalling, ensure a snug seal to prevent unfiltered air from bypassing filtration. While beneath the cover, verify the air filtration pathway isn’t obstructed by debris or oil splatter. Keep the surrounding area clean; contamination can transfer to the carburetor. Replace the filter at intervals or after exposure to fuel contamination incidents. After reseating, run a brief test to confirm smooth idling and steady airflow. Maintain records for future service intervals.
Check Oil Level
Checking the oil level goes hand in hand with inspecting the air filter, so we’ll move to this next step now. We’ll verify the oil level, wipe the dipstick clean, reinsert, then pull it again to read accurately. If oil is below the minimum mark, add the recommended grade until the level sits between marks. Do not overfill. Run the engine briefly, then recheck after it cools. Always use a clean funnel and work in a well-ventilated area to avoid fuel stability hazards. Dispose of used oil per local regulations. Oil leaks or contamination require service before operation. Table below clarifies steps and outcomes.
| Step | Action | Result |
|---|---|---|
| 1 | Check dipstick | Confirm level |
| 2 | Add oil if needed | Maintain oil level |
| 3 | Run and recheck | Verify stability |
| 4 | Inspect for leaks | Ensure safety |
Check and Replace Spark Plug if Needed

Have you ever started a portable generator only to hear it sputter or fail to start? We’ll inspect the spark plug first, then decide on replacement. Power off, unplug, and disconnect the spark plug boot to prevent shocks. Locate the plug, note its orientation, and remove the spoke wire carefully with a spark plug socket. Inspect the insulator for cracks, carbon tracking, or heavy fouling; if damaged, replace. If it’s reusable, gap the electrode to the manufacturer’s specification and clean deposits with a non-metal brush. When reinstalling, torque to spec and reattach the boot firmly. After firing, observe ignition timing signs; if misfiring persists, revisit plug condition and connections. Keep spare plugs on hand and replace as part of routine maintenance.
Examine the Fuel System and Carburetor Basics
Now that the spark plug check is done, we’ll turn to the fuel system and carburetor basics. We begin with a visual inspect of the fuel lines for cracks, leaks, or age-listed damage, replacing any compromised components. Relieve fuel pressure safely, disconnect the fuel source, and wipe away dirt before handling. Next, remove the air filter housing and inspect for excessive grime; clean or replace as needed to maintain proper airflow. In carburetor basics, note float level, needle seating, and choke operation. If fuel sticks or varnish forms, use a carburetor cleaner, following label directions, and avoid oil contamination. Reassemble securely, reattach fuel, and test for leaks. Start and run briefly to confirm steady idle, smooth acceleration, and consistent fueling. Safety remains paramount throughout.
Test the Battery, Safety Switches, and Electrical Basics
We’ll start by verifying the battery’s state of charge and connections, then inspect safety switches for proper operation. We’ll test for continuity and function in the mains and output circuits, noting any faults or abnormal readings. We’ll keep our approach precise, follow safety protocols, and address issues before powering the generator.
Battery Function Checks
What’s the battery’s condition, and is the safety system ready to protect you? We’ll run a concise battery function check now, focusing on battery health and charging basics. We disconnect power, wear gloves, and inspect terminals for corrosion. We test voltage with a calibrated meter, note the state of charge, and verify the safety switch is engaged when cranking. We perform load testing within manufacturer limits, then observe response times and system alarms. If readings drift, we label the unit, log results, and plan reconditioning or replacement.
| Battery health | Charging basics | Safety indicators |
|---|---|---|
| Terminal cleanliness | Correct charger/amp output | Emergency stop ready |
| Voltage stability | Proper charging cycle | Fuse and relay check |
| Battery age | Resting voltage after charge | Fail-safe available |
Safety Switch Inspections
From here, we’ll inspect the safety switches and related electrical basics to ensure the generator only starts and runs when it’s safe. We begin with a clear battery check, confirming terminals are clean and connections tight. Next, we perform safety switch testing: confirm the switch trips within the specified delay, and that the handle releases under fault conditions. We verify that the kill switch, run/stop, and master disconnect respond as designed. Then, we review wiring diagrams to ensure correct wiring paths and labeling, preventing cross-connections or short circuits. We test interlocks to ensure the cover or enclosure must be in place for operation. Finally, we document all findings and replace any worn components before fuel or load is introduced.
Run a Compact Operational Check and Leak Scan
We start with a compact operational check and a leak scan to confirm the generator’s basic readiness before use: we’ll power the unit, listen for unusual sounds, and inspect all fuel and oil connections for signs of leaks or damage.
We perform a quick pressure test to ensure lines hold with the cap secured and no gauges show abnormal readings. If pressure fluctuates, pause and recheck fittings. Next, we scan for leaks, touching joints and hoses with a dry hand to detect dampness.
| Step | Action | Outcome |
|---|---|---|
| Power | Start unit briefly | Normal startup |
| Listen | Listen for raps or hisses | No abnormal sounds |
| Inspect | Check seals | No leaks detected |
Proper Storage, Long-Term Care, and Seasonal Prep
Proper storage, long-term care, and seasonal prep keep your portable generator ready for dependable power when you need it most. We begin with clean, dry storage, protected from dust and humidity. After shutdown, allow the engine to cool, then drain or stabilize fuel per manufacturer guidance to prevent varnish and gum buildup. Perform long term maintenance by replacing oil and inspecting air filters before long storage periods. Store in a ventilated area away from ignition sources, and keep the unit on a stable surface to prevent tipping. Use a surge protector and battery disconnect if applicable. Practice storage etiquette by labeling storage dates and service milestones. Schedule seasonal pre-checks to verify spark plug, carburetor float, and fuel system integrity for reliable startup, every time.
Troubleshooting Common Generator Issues After Service
After completing service, we’ll walk through common generator issues and how to troubleshoot them safely. If you notice no start, confirm fuel freshness, proper wiring, and battery condition, then perform a controlled start with the safety switch engaged. Listen for abnormal noises, and check exhaust for blockages. For power irregularities, verify a correct load, inspect connections, and test voltage against specs using labeled meters. When start up calibration is needed, follow sequential steps: cold start, warm-up, and recheck readings until stability is achieved. If voltage stability fluctuates, recheck regulator, ignition timing, and grounding. Always de-energize before adjustments, wear PPE, and keep hands clear of belts. Document findings, then re-test under load to confirm consistent performance. End with a safe shutdown and secure inspection.
Frequently Asked Questions
How Often Should I Change the Generator Oil After Servicing?
We change the oil every 50–100 hours of operation or per manufacturer guidance after servicing; then we replace old fuel handling and oil disposal materials safely, documenting intervals, and disposing of fluids according to local regulations.
Can I Service a Generator With the Fuel Still in the Tank?
Yes, we can’t service with fuel in the tank. About 25% of generator failures are fuel-related. We’ll clamp, disconnect power, drain safely, then perform gasoline storage checks and fuel line inspection before maintenance.
What PPE Is Recommended During Generator Maintenance?
We recommend glove selection that fits the task and provides grip, breathability, and protection, plus hearing protection. We’ll wear eye protection, avoid loose clothing, and follow lockout/tagout steps during generator maintenance.
How Do I Verify the Generator’s Output Accuracy After Service?
We verify generator output by comparing measured voltages and frequencies to specs, then perform controlled load testing. We use calibrated meters, record results, and confirm stability under running loads, ensuring accuracy before returning to service and safety checks.
Are There Safety Checks Required Before Bringing It Back Online?
Yes—before bringing it back online, we perform a safety check and a pre service inspection. We verify grounding, oil levels, fuel, sparks, and overload protection, documenting any anomalies and ensuring clearance and ventilation for safe restart.
Conclusion
We’ve covered safety-first steps, from air-filter checks to carburetor basics, battery tests, and leak scans. By following these procedures, you’ll keep your portable generator reliable and ready. Think of your maintenance plan as a well-tuned engine: a precise rhythm that prevents surprises. When in doubt, pause, recheck connections, and consult the manual. With disciplined care, you’ll extend life, reduce failure chances, and stay prepared for any power need.

